


Technical SEO for Shopify

This article is Chapter 4 of our 288-page Shopify SEO guide.
Check out the full eBook.If you’ve read much on SEO from the past couple years, you’ve probably heard about the growing importance of Technical SEO.
And while Shopify may handle many technical SEO issues for you, there’s still plenty you should do.
After manually reviewing hundreds Shopify stores, here’s some things I’ve learned.
What is Technical SEO?
Technical SEO is the process of tweaking a website to help search engines more efficiently crawl and index it.
As the name suggests, this is commonly about technical improvements such as improving loading time, auto-generated pages, faceted navigation, etc.
How does this apply to Shopify?
While we have no control over the server itself, we can do speed optimisation for Shopify, along with fixing a number of technical issues that happen out of the box.
This done with a standard audit and crawl process, looking for common types of issues, along with crawling the website (usually manually and with tools) to identify others.
How to do a technical SEO audit for Shopify stores?
I usually do this with three steps:
- Manually look through the website
- Crawl the website with a tool like ScreamingFrog
- Check Google Search Console
Let’s break these down…
Common Shopify Technical SEO Issues
The best place to start is a checklist, which is even easier with a little background knowledge of how Shopify works.
So to make this even easier, let me just show you all the most common technical SEO issues with Shopify, how to find them, and how to fix them.
Directory URL Structure
In any typical eCommerce SEO guide, the suggestion would be to structure internal links similar to this:
/category/subcategory/ e.g. /sofas/leather/
This provides context to users and robots that leather is a subtopic of sofas.
Unfortunately Shopify does not enable this without the use of tags and heavy theme modifications to add functionality to tag pages - by default tags have duplicate H1 and badly optimised title, meta, etc.
This leaves you with all your category pages structured like: /collections/sofas /collections/leather-sofas
There is no decent solution to this problem, besides doing the best you can with how it works. That means using optimised URLs for subcategories i.e. /leather-sofas rather than /sofas/leather and treating these as subcategories within navigation and internal links.
My Shopify URL structure article explains this in more detail.
Internal Product Links
Following on from the category directory structures, there’s also the odd setup for products.
By default product URLs are: /products/name-of-product
However, when accessed through a collection (i.e. category) page, this becomes: /collections/name-of-category/products/name-of-product
(Just open any product from one of your collections to see if this happens on your store)
The problem with this is it’s only for show, check any of these product pages for a canonical tag and you’ll see a bit of code telling robots the original page can be found at the /products/name-of-product page.
This means every single product in your store has internal links to the wrong URL. And while you could argue they’re “canonicalised” therefore shouldn’t be an issue, this canonical tag serves little more than a recommendation and is often ignored by search engines.
This can lead to the same product being indexed in search engines multiple times, and a waste of crawl budget accessing the same product via multiple URLs.
All for (presumably) two benefits:
- It’s user-friendly to see the category of product
- It supports breadcrumb links (next part!)
None of these justify the SEO downsides, so I’d highly recommend fixing these links by modifying your theme files to link directly to product pages.
You can do this under Online Store > Themes > Customize > Theme Actions > Edit Code > Snippets > product-grid-item.liquid:
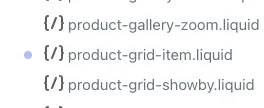
Then removing the text that says “within: collection”:

Hit Save and all your links should be fixed. Just be careful to remove all instances, sometimes your theme may have multiple links or have a slightly different structure.
Breadcrumbs
As mentioned in the previous step, breadcrumbs are broken when you fix internal product links.
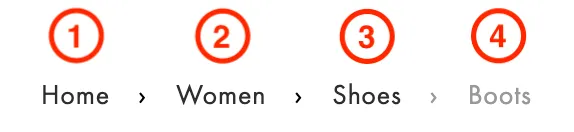
If you don’t know what breadcrumbs are, they’re the little links that help you navigate up (i.e. back) through pages prior to accessing this page.
Example here:
You should at minimum be using these on collection pages and product pages.
By default, Shopify uses the URL to dynamically insert breadcrumb links based on which collection you accessed this product through. This isn’t ideal in the first place, but it’ll be completely broken when you fix the internal product links.
The alternative is to manually set a breadcrumb for each product or even category. This can then be stored and accessed with a custom metafield, then used in the breadcrumb theme section.
For example, you could create a metafield named “breadcrumb” and store the collection handle in there of “leather-sofa”.
Within the breadcrumbs theme section, you can then use this to add a breadcrumb, like so:
<a href="{{ collections[product.metafields.global.breadcrumb].url }}">{{ collections[product.metafields.global.breadcrumb].title }}</a>This re-enables breadcrumb functionality and provides additional control over this, which is even better for SEO.
Product Tags
Within the Shopify ecosystem, tags are used for products as filters, as you’d commonly see in a typical eCommerce faceted navigation:
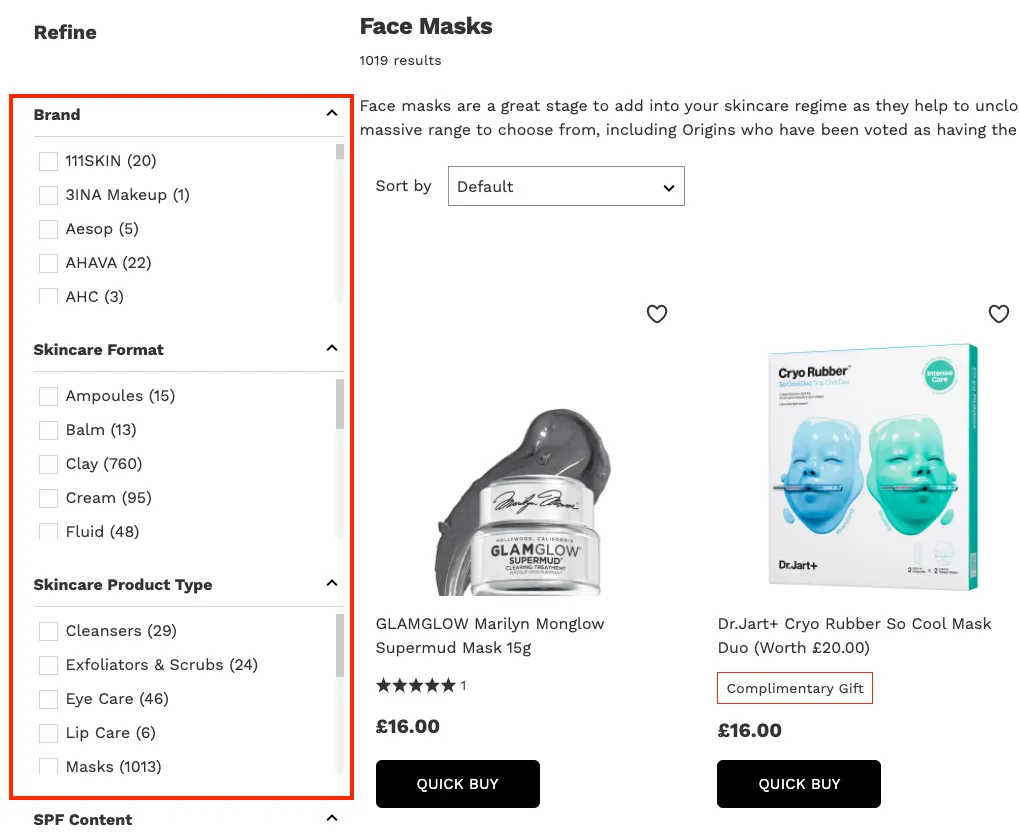
The problem with these tags is the thin content pages they create.
Let’s say you have 3 size options: 125ml, 275ml, and 500ml. Then you tag all products across all your categories with whichever sizes are offered.
You’ll now have tag pages automatically generated such as:
/collections/perfume/125ml/collections/perfume/275ml/collections/perfume/500ml
This is a great thing for SEO because it’s possible these are keywords people are searching for. Maybe someone is specifically looking for 275ml perfume.
However, it’s wasted on Shopify for two reasons:
- If you happen to write the tag with a space, it’ll change the space to a ”+” (i.e.
125ml+option) which is blocked byrobots.txtby default - The auto-generated tag page cannot be customised with unique H1, meta description, title tag, content, etc
This leads to a whole bunch of near-duplicate pages with the only difference being the title tag will say along the lines of:
Perfume: Tagged “125ml” - Brand
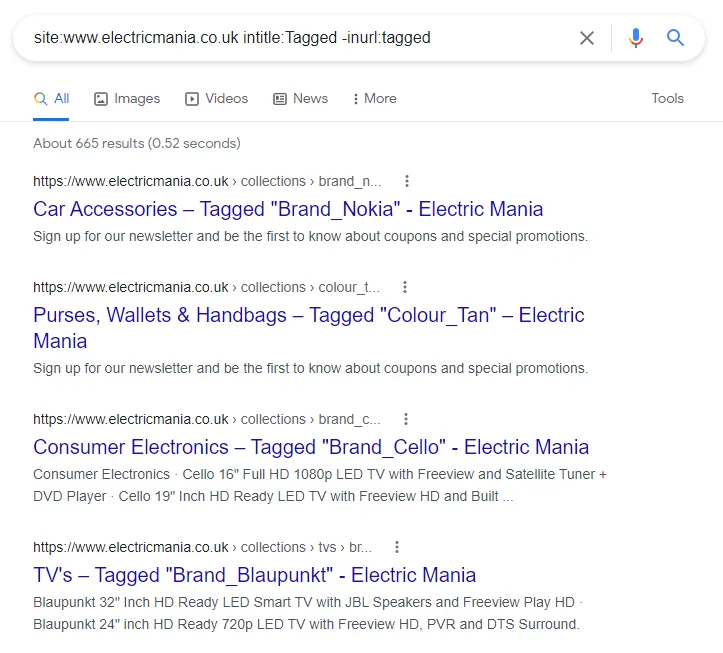
You can easily check if this is happening to your store with a clever Google search: site:yourwebsite.com intitle:Tagged -inurl:tagged
If there’s no results, you probably don’t have this issue. If you see this (below), you do:
The fix to set these tag pages to noindex, follow (easy), then noindex links to these tag pages as nofollow (advanced) block these with Robots.txt to save crawl budget.
Then you can manually create these tags as new collections (i.e. category pages) where there’s search volume.
This can be done in your theme.liquid file with a simple bit of code:
{% if current_tags %}
    <meta name="robots" content="noindex, follow">
{% endif %}
I’ve written about this more extensively in my Shopify Product tags article.
Blog Tags
Similar to product tags, you can also use tags for blog posts to filter posts. These are commonly used on Shopify blogs to separate different blog post categories.
The problem, as with product tags, is this leads to many pages being created which you have no control or customisation over i.e. thin content.
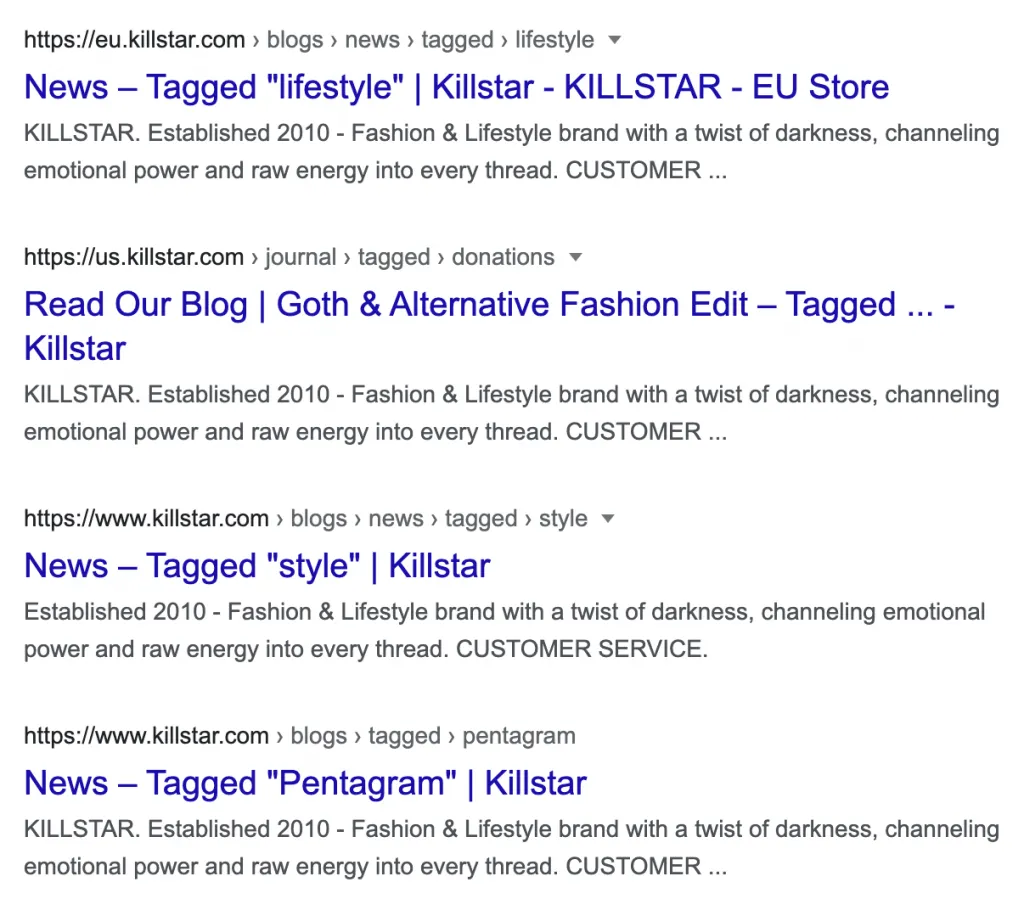
You’ll see this under URLs like: /blogs/news/tagged/name-of-tag
Or with a quick Google search: site:YOURWEBSITE.com inurl:tagged
Thankfully, this is another simple fix with a code snippet added to your theme.liquid file (same as product tags):
{% if current_tags %}
    <meta name="robots" content="noindex, follow">
{% endif %}
Vendor Collections
Another thing that can lead to potentially 100+ thin content pages are what I call “vendor pages”.
You can find these by doing a Google search for: site:YOURWEBSITE.com inurl:collections/vendors
In most cases, it is a great idea to have a category page for each of your vendors (i.e. suppliers, brands, manufacturers), however Shopify’s default implementation is fairly useless from an SEO perspective.
There’s numerous reasons for this:
- The page URLs are defaulted to
/collections/vendors?q=Name. Even ignoring SEO, these are not user friendly URLs. - These pages are auto-generated, if you happen to have a vendor with 2 or more words the space between is replaced with a ”+”, which is blocked by
Robots.txt. Meaning, if you have a supplier with 2+ words, search engines won’t be able to access the page. - Even if search engines can access the page, it can’t be customised by default with content or SEO optimisation settings, therefore is practically useless.
So how do we fix this?
Set these pages to noindex, follow by customising your theme.liquid file like this:
{% if template contains "collection" and collection.handle == "vendors" %}
    <meta name="robots" content="noindex, follow">
{% endif %}
This is a backup, but also good to do first if they’re already indexed to have them removed first.
Then block them in your Robots.txt file (explained below).
If you’d like to rank for any vendors brand names, which I’d highly recommend, manually create these as new collections.
Product Types Collections
Similar to vendor pages are product type pages. These can be find under a similar type of parameter URL: /collections/types?q=Name
Or again by searching Google: site:YOURWEBSITE.com inurl:collections/types
These again are automatically generated from the “type” field when creating your products in Shopify.
As with vendor pages, these have all the same issues as vendor pages and no upsides. Usually product types are literally the same as your categories (i.e. collection pages), therefore this provides no benefits.
Set these to noindex, follow as before and then block with Robots.txt:
{% if template contains "collection" and collection.handle == "types" %}
    <meta name="robots" content="noindex, follow">
{% endif %}
Other Default Pages
Beyond this, there’s sometimes other pages that provide zero value to search engines or users of search engines, so may as well be noindexed also.
These can include:
/collections- A list of all collections on your store/collections/all- A list of all products on your store (with pagination this can really become a lot of unnecessary indexed pages)/collections/new- A list of new products on your store
And any others manually created such as best selling products lists. These can all be set to noindex, follow if not being used, with the following code added to theme.liquid:
% if (template contains "collection" and collection.handle == "all") or (template contains "collection" and collection.handle == "new") or (canonical_url == "https://YOURWEBSITE.com/collections") %}
    <meta name="robots" content="noindex, follow">
{% endif %}
Setup a Custom Robots.txt File
As of June 2021, you can finally setup a custom Robots.txt file on Shopify! This will give you significantly more control over the above issues.
Start by taking a look at your current Robots.txt file here: https://YOURWEBSITE.com/robots.txt
As for customising this, here’s how to do it…
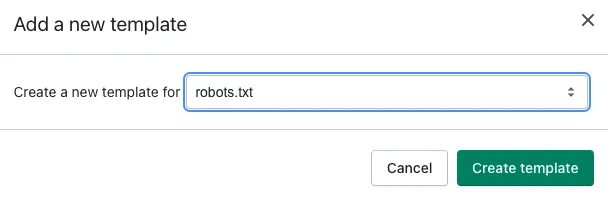
Go to your Theme Editor then under Templates click “Add a new template”:
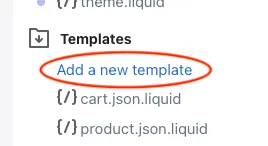
From there, select robots.txt and click Create template:
You’ll now have a robots.txt.liquid template file with the default robots.txt information added:
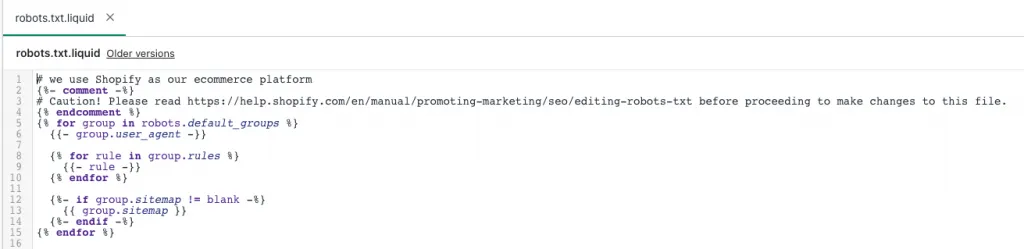
The good news is we can now remove or add additional rules by modifying this file, for example:
# we use Shopify as our ecommerce platform
{%- comment -%}
# Caution! Please read https://help.shopify.com/en/manual/promoting-marketing/seo/editing-robots-txt before proceeding to make changes to this file.
{% endcomment %}
{% for group in robots.default_groups %}
    {{- group.user_agent -}}

    {% for rule in group.rules %}
    {{- rule -}}
    {% endfor %}

    {%- if group.user_agent.value == '*' -%}
{{ 'Disallow: /collections/all*' }}
{{ 'Disallow: /*?q=*' }}
{{ 'Disallow: /collections/*/*' }}
{{ 'Disallow: /blogs/*/tagged/*' }}
    {%- endif -%}

    {%- if group.sitemap != blank -%}
    {{ group.sitemap }}
    {%- endif -%}
{% endfor %}(WARNING:* Please be careful using this, if you haven’t yet fixed internal product links this will cause crawling issues)*
This will block search engines crawling:
/collections/all- List of all products with pagination (usually not needed)/collections/vendors?q=- Auto-created collections for each vendor (explained above)/collections/types?q=- Auto-created collections for each type of product (explained above)/collections/any-collection/tag-name- Product Tag Pages/blogs/any-blog/tagged/tag-name- Blog Tag Pages
For more tips on modifying this, read our full Shopify robots.txt guide.
Canonicalise or Merge Product Variants
Product variants are something you have to watch out for as you’re creating a lot of products. If you’re creating a separate product for each variant, this can lead to a lot of unnecessary pages.
Here’s an example from Gymwear where they have 6 identical products besides the colour:
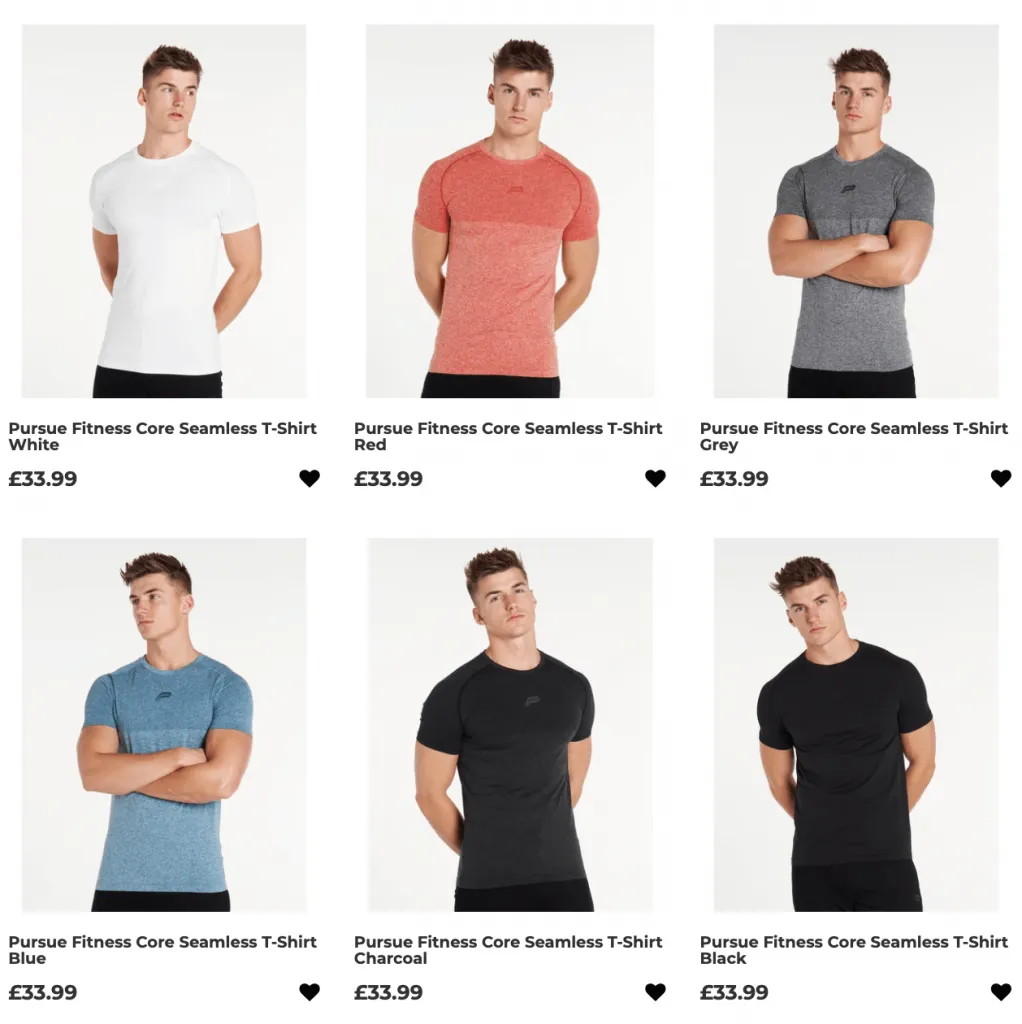
This may be a good thing if each one has search volume, but are people really searching for “core seamless t-shirt white” or “core seamless t-shirt red”? Probably not.
In which case, you can merge these all into a single product with variant options set within Shopify.
Or if that’s not user friendly, like in this case where users want to see all the colour options before clicking, you can use a simple “canonical tag”.
A canonical tag tells robots where to find the original version of a page. This allows you to have 6 products, but each of them point into a single product that robots (i.e. search engines) know is the original to index.
All you have to do is link to the “original” page in a canonical tag.
This can be achieved with a custom meta field, like you can edit here:
https://YOURSTORE.myshopify.com/admin/bulk?resource_name=Product&edit=metafields.global.canonical,metafields.seo.hidden:boolean&limit=250Then modifying the theme.liquid file to use this meta field if applicable:
{% if product.metafields.global.canonical != blank %}
<link rel="canonical" href="{{ product.metafields.global.canonical }}">
{% else %}
<link rel="canonical" href="{{ canonical_url }}">
{% endif %}
For more details here, refer to our Shopify Product Variants guide.
301 Redirect Deleted Products
A much easier part of SEO maintenance is redirecting deleted products. This isn’t urgent, but it’s helpful for users (and robots) to be redirected to a relevant page rather than landing on a 404 page.
Thankfully, this is extremely easy to do.
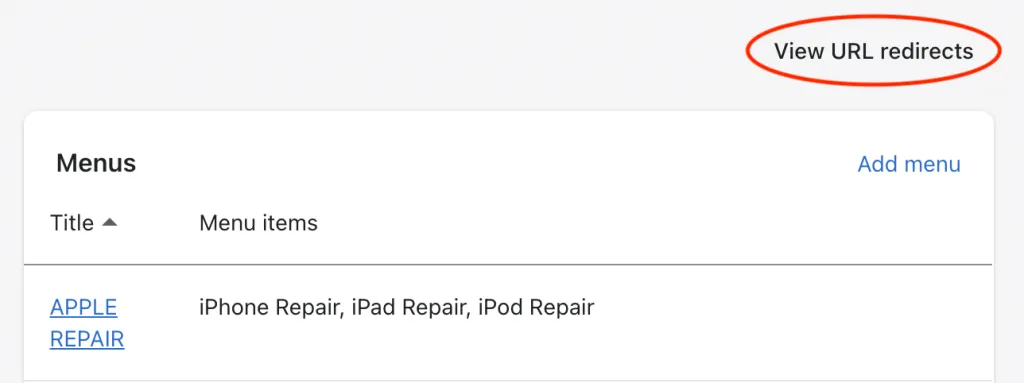
Next time you’re deleting a product, go into the Shopify redirects section (Shopify Admin > Online Store > Navigation > View URL redirects):
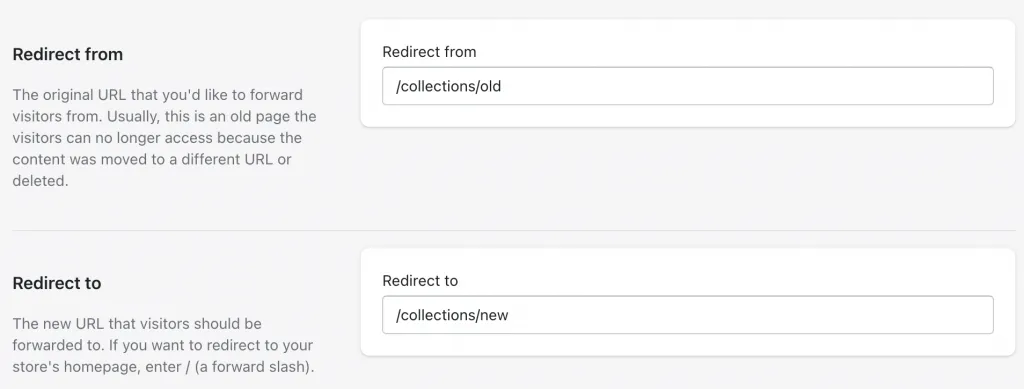
And create a new redirect:

Then you can enter the old URL and where to redirect it to (the most similar product or collection), then it’s done:
Use Structured Data
Structured data is a method of explaining your content. This is usually done with Schema.org markup.
Most Shopify themes will integrate this by default, but it’s worth double checking and ensuring it’s set up correctly.
Product Structured Data
Product schema is probably already set up within your theme, but double check the setup here.
You want to make sure at least the following properties are used:
- Name
- Offer — Price, Availability, priceCurrency, URL
- Brand
- Description
- Image
We’ve seen many themes skip the “URL” part of the offer, which is an easy fix, but usually causes a warning message in GSC.
Article Structured Data
For your blog posts, you’ll want to use Article structured data. Again, this is probably setup by default but worth checking.
You want to make sure at least the following properties are used:
- Headline
- Image
- dateModified
- datePublished
BreadcrumbList Structured Data
BreadcrumbList is a markup to explain the breadcrumb and the position of each link.
Position is important here for context. If you look at a typical breadcrumb, here’s how the positions work:
In schema.org code, this could look like so:
{
"@context": "https://schema.org",
"@type": "BreadcrumbList",
    "itemListElement": [{
    "@type": "ListItem",
    "position": 1,
    "name": "Books",
    "item": "https://example.com/books"
    },{
    "@type": "ListItem",
    "position": 2,
    "name": "Authors",
    "item": "https://example.com/books/authors"
    },{
    "@type": "ListItem",
    "position": 3,
    "name": "Ann Leckie",
    "item": "https://example.com/books/authors/annleckie"
    }]
}
Make sure your theme is using this, it’ll probably be under Snippets (Store > Themes > Customize > Theme Actions > Edit Code) named breadcrumbs.liquid.
A full breakdown of recommended structured data can be found in our Shopify Rich Snippets tutorial.
Remove from sitemap
Here’s an odd one, if you’ve ever used any other CMS before, your instinct would be that if you set a page to canonical or noindex, it’d automatically remove it from the sitemap. Unfortunately that isn’t the case.
Instead we need to manually remove from the sitemap, but there’s bad news again, there’s no real simple option for doing that.
Oh, and we can’t modify the sitemap out of the box. More fun.
Fortunately, there is a little known hidden meta field that can do this for you:
https://YOURSTORE.myshopify.com/admin/bulk?resource_name=Product&edit=metafields.global.canonical,metafields.seo.hidden:boolean&limit=250The above link will let you edit the “hidden” SEO meta field, simply tick the box to remove from sitemap and modify a custom canonical meta field, if that’s the name you use (as explained above).
But there’s an important catch:
By ticking the seo.hidden meta field, you’ll automatically set your page to noindex,nofollow. Which means don’t index this page in your search engine AND don’t follow links. Neither option is ideal, and both are bad for canonicalised pages.
Therefore, I’d recommend having a developer strip this code from the page, similar to below.
Find {{ content_for_header }} in theme.liquid and replace with:
{% capture content_for_header_fixed %}
{{ content_for_header }}
{% endcapture %}

{% if product.metafields.seo.hidden == 1 or collection.metafields.seo.hidden == 1 %}
    {{ content_for_header_fixed | remove: '<meta name="robots" content="noindex,nofollow">' }}
{% else %}
{{ content_for_header }}
{% endif %}
It’s a little bit of a hacky workaround, but it’ll work and it’s better overall for SEO.
I’ve explained this in more detail in our Shopify XML Sitemap guide.
Crawling for other issues with Sitebulb
The above issues will cover quite a lot in Shopify, but there’s likely others that you’re missing if you only use a checklist-like process.
To find them, we need to do a crawl of your website.
This is where we have our own robot go through every page of your website, like a search engine, and identify any issues it can find.
For this process, I’m going to use Sitebulb. But Screaming Frog is a popular alternative for this, and other tools including Ahrefs and SEMRush can also do this.
Here’s how…
Starting the crawl
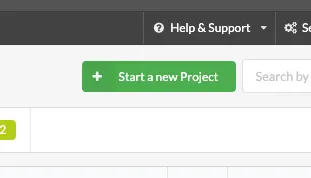
Click the green “Start a new Project” button:
Enter your project details:
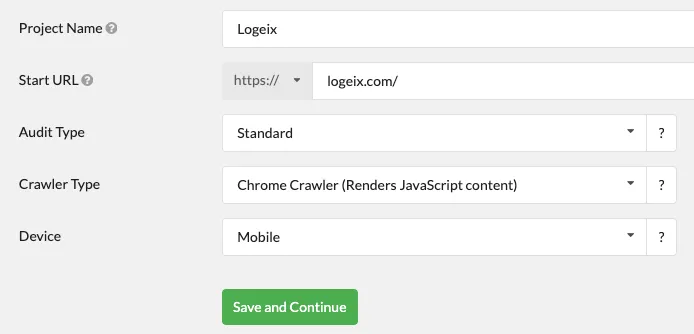
I’d probably recommend using the Chrome Crawler for eCommerce sites, most won’t need it, but it’s a good catch-all as a few eCommerce stores use javascript faceted navigation and product grids.
Click Save and Continue when done.
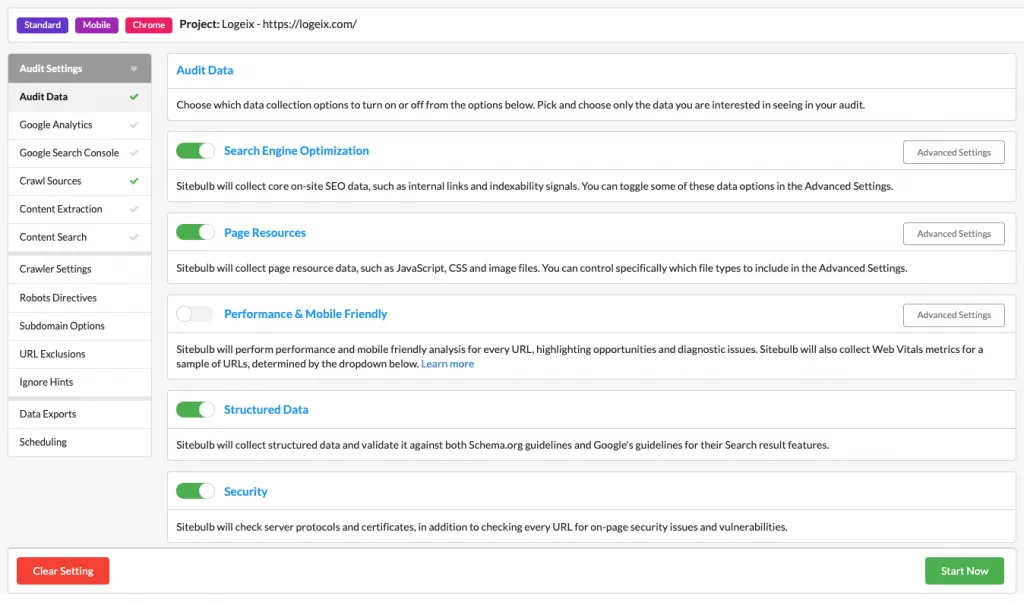
Next, configure your options. All I did here was turn on “Structured Data”.
Then click Start Now:
Reviewing the crawl
Now you’ll have to wait for the crawl to finish, this could take a while as you’re likely to have hundreds or thousands of product pages:
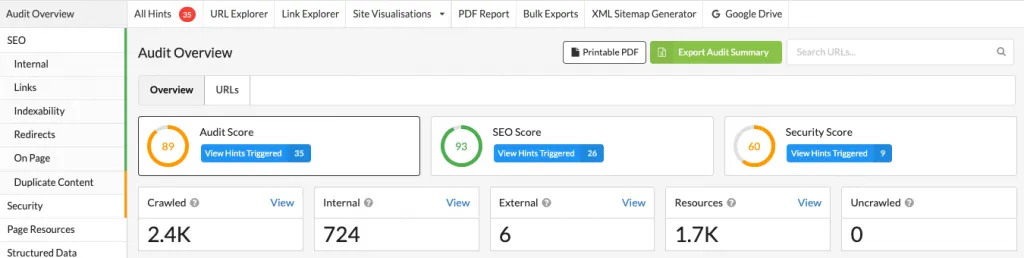
Once it’s done, it’ll look like this:
Click “View Hints” here:
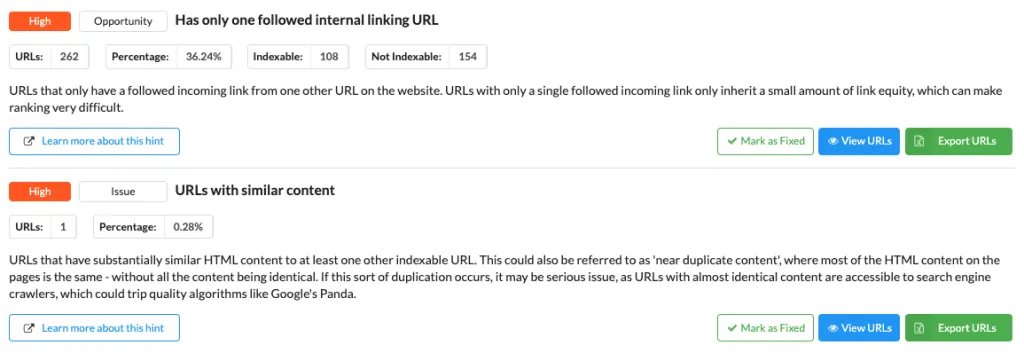
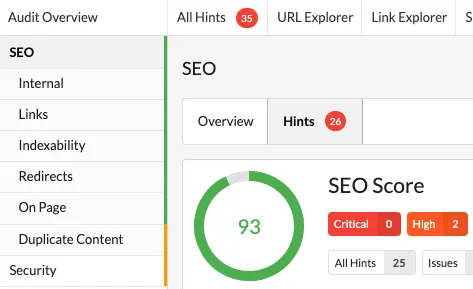
And you’ll see a list of issues:

This will tell you all the critical (red light), warning (orange light), and low priority (green light) issues to fix.
Coverage
The coverage section is particularly helpful for finding issues. This is the section that tells you which pages are being indexed in Google:
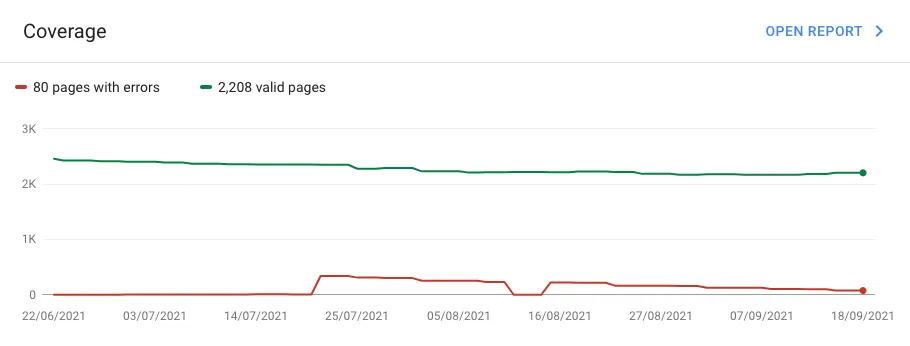
Any of the pages with warnings you can likely fix and get indexed.
Any of the pages excluded will likely be because of the robots.txt or noindex tag, so just double-check if that’s intended. If it’s not intended, fix it!
404s
You can also find your 404s under the URL Status section:
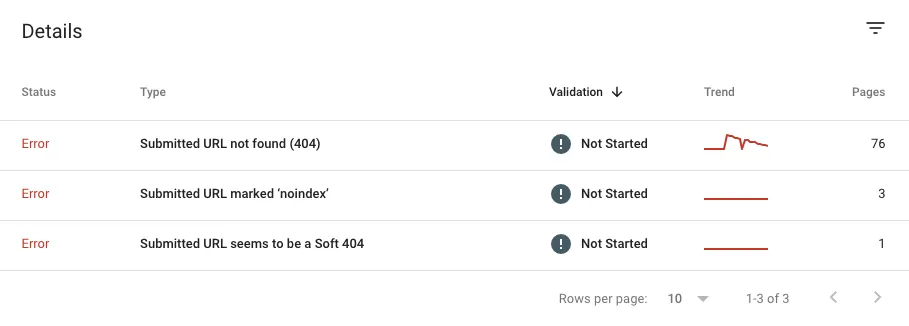
This is where you’ll find pages that weren’t found (which should be redirected).
Google Search Console
Lastly, and importantly, connect your Google Search Console data to see issues that Google is seeing (not a crawl tool).
Click “Add Data” in the top right:
Select Google Search Console:
Select which domain you want to add GSC data for, and click continue.
It should open in a new browser window, allow access, and it’ll connect.
This adds a few new things:
- Organic Sessions metrics for all URLs
- Crawl data (number of pages crawled and bytes downloaded)
- Sitemap
- Structured data errors
- Core Web Vitals
Here you’ll see enhancement issues from Google:
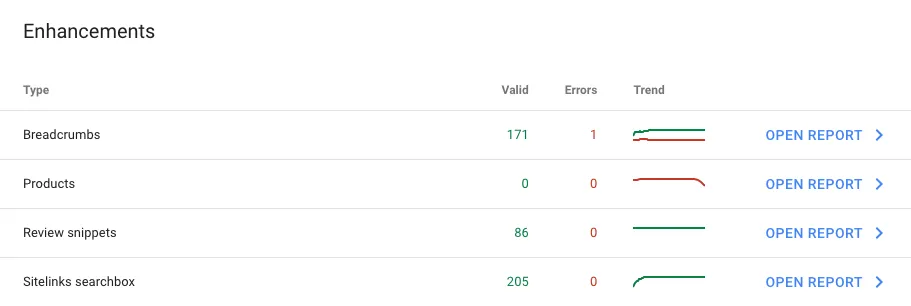
Such as Structured Data, Core Web Vitals, and mobile usability.
You can also find indexation problems:
This is the Google Search Console data shown in Sitebulb, you can also view this all directly in GSC too.
Final Thoughts
Technical SEO for Shopify stores can be a little more complicated than other platforms as you can’t just install a plugin to fix a lot of these issues.
However, I’d also argue it’s significantly easier as the issues are minimal compared to something like WordPress.
You just need to learn what they are and how to fix them!
If you’re serious about SEO for your Shopify store, take the time to fix the issues listed above and use a crawler like Sitebulb and Google Search Console to identify any others you may have.