


Shopify Speed Optimization Guide

This article is Chapter 7 of our 288-page Shopify SEO guide.
Check out the full eBook.One of the most common problems our Shopify clients run into is slow loading pages.
But is Shopify actually slow?
Not at all.
In fact, even out of the box Shopify can be pretty quick. But when cleaned up with a few core concepts like image optimization, lazy loading, and app analysis and optimization; you can make any store lightning fast.
Here’s how to do that…
Why optimise your site speed?
Page speed is hugely important for conversion rates i.e. your actual website visitors. The slower your pages load, the higher your bounce rate, therefore the less people will stay on your website.
From an SEO perspective, while having a lightning fast website may not necessarily increase rankings, having a slow or inconsistent loading website will most definitely damage them.
Therefore, the question becomes “How fast do your web pages need to load?”
According to the Google Webmaster Team when asked what a “good responsive time” to aim for, they said:
Studies by Akamai claim 2 seconds as the threshold for ecommerce site “acceptability.” Just as an FYI, at Google we aim for under a half-second.
To put this into perspective, we did a study of 1,200 eCommerce stores and found the average page loading time to be 3.97 seconds.
Many websites also fared much worse:
- 72.67% of stores had slower average loading times than 2 seconds
- 55.08% of stores had slower average loading times than 3 seconds
- 22.98% of stores had slower average loading times than 5 seconds
In short, if you want more sales and better SEO rankings, you should take the time to optimise your site speed.
What has Shopify optimised by default?
There is some good news though:
Shopify is well aware of the importance of site speed and out of the box provides multiple optimisations you won’t need to spend time on. These are…
1. Server configuration
Shopify servers are fast so there’s nothing to worry about here.
Gone are the days of choosing the best hosting provider and configuring the server for uptime and speed, this is all managed for you - and exceptionally well.
2. Leveraging Browser Caching
Browser caching allows some important and regularly accessed files such as Javascript and CSS files (for style and functionality) to be downloaded to the users’ device, then accessed locally rather than re-downloading each visit. This can make a big difference to page loading times, but thankfully is built in to Shopify by default.
3. Using a CDN
A content delivery network (CDN) is where files are stored on servers across the world, then loaded from the nearest server to your visitors’ location. A visitor from the UK may have files loaded from a London server, whereas someone in New York may have them loaded via a NY server. This again increases site speed and again is managed by Shopify with their CDN run by Fastly and CloudFlare.
How to optimize your Shopify site speed
Choose a Lightweight Theme
Themes can be badly coded or bloated with design features such as sliders, carousels, and huge mega menus.
These aren’t always necessarily bad features, but can quickly slow down a website unnecessarily.
A quick win if you’re starting out is to simply choose a lighter theme that’s either coded more efficiently and/or less bloated with features.
Here’s a few lightweight example themes:
Now you’re far from limited to this selection, there are many light themes and any theme can be modified to load faster. But it may be worth considering for a brand new website.
For existing websites though, analyse your theme and see where you can make improvements.
Can you switch from a slider to a single hero image? Can you reduce a carousel from 100 products to a more reasonable 8-12? Is the quick view feature being loaded on the initial page load?
Select the right image file format
Different file formats have different benefits in terms of quality and file size therefore loading time.
As a general rule, product images should be in WebP or JPEG format for the lowest file size as quality isn’t as important. But will still look great if compressed well.
For hero images and other images with text inside them, you’re usually going to use a lossless format like PNG, though again WebP is suitable here.
And for your logo and theme icons, make sure you’re using SVG format for high quality and scalable images.
The main consideration here is both quality and size.
Compress Images
Choosing the right file format is only part of the battle, next you need to compress your images.
I did a quick test of 3 random images to see how much smaller the files were after compression:

You can see they ranged from 49-77% smaller files, which is a massive reduction.
Thankfully, this is extremely easy to do with a Shopify App, you can automate the entire process.
Just install a compression app like Crush.pics and you’re off to the races.
Or if you have any difficulties or want to do it manually, you can use a free website like TinyPNG.
Reduce Large Image Sizes
The other thing you should pay attention to is the dimensions of the image you’re uploading.
If you’re working with photographers to capture your products, it’s likely they’re sending you back huge HD photos so you have more flexibility on where and how to use them.
For the web though, you want to reduce images to the size they’ll be shown.
As an example, your visitor may be on a 400px wide mobile device, but your image is 2,000px wide. That’s 5x the size of what they need, which will not only load slowly but also appear low quality as it’s shrunk down so significantly.
The process then is two parts:
- Resize images on upload to the max size needed (this may be 2x the dimensions shown to cover for retina displays)
- Use
srcsetto selectively show different image sizes
The second part of this will likely need a developer, but is extremely efficient on optimal images and loading times.
Here’s an example of how that may look:
<img
  alt="A baby smiling with a yellow headband."
  srcset="
    baby-s.jpg  300w,
    baby-m.jpg  600w,
    baby-l.jpg  1200w,
    baby-xl.jpg 2000w
  "
  sizes="70vmin"
>
In this case we’re informing the browser what image to show based on the width of the image and space it has to display.
This way, mobile devices are likely to load a small file, whereas fancy retina devices will load the XL size. This maintains consistent quality across devices, while optimising for speed.
You don’t have to do this for every image though as we also have lazy loading.
Lazy load images
Typically when a page is opened, every script, image, and resource is loaded immediately on load to ensure things are displayed correctly. But is that always necessary?
Collection pages, for example, could easily have 24+ product images, but how many of them are visible even after the page loads. Many are further down the page and require scrolling to even see.
Lazy loading is where you defer loading of images until they’re actively visible.
This could be not loading images until they’re almost visible on the screen. Or only loading the first 2 product images in a carousel, then loading the rest as you click.
Now setting this up is a future blog post on its own, but here’s the short version:
- Add the lazysizes.js library to your theme assets folder and include it in
theme.liquid - Update image tags by swapping
srcwithdata-srcand adding thelazyloadclass
So you’ll have a standard image which may look like this: <img src="IMAGE_URL.jpeg">
Which would now look like: <img data-src="IMAGE_URL.jpeg" class="lazyload">
The difference is you’re replacing src with data-src and adding the class lazyload. That’s all, it’s pretty simple, though I’d recommend having a developer do this for you.
Properly uninstall unused apps
You’ve probably heard this before, but apps can severely slow down your website.
But then carrying bags of money is heavy too, that doesn’t mean I’m going to drop them.
The trick is to only install apps that you need, some can even be hardcoded into your theme, optimising these apps, then uninstalling the rest.
One problem you may run into when uninstalling apps is leftover code in your theme. These usually aren’t removed when uninstalling the app, unless done manually.
To fix this, start by running your website on Google’s PageSpeed Insights tool.
Look for the “Reduce the impact of third-party code” and you’ll find a huge list of scripts loading from other domains:
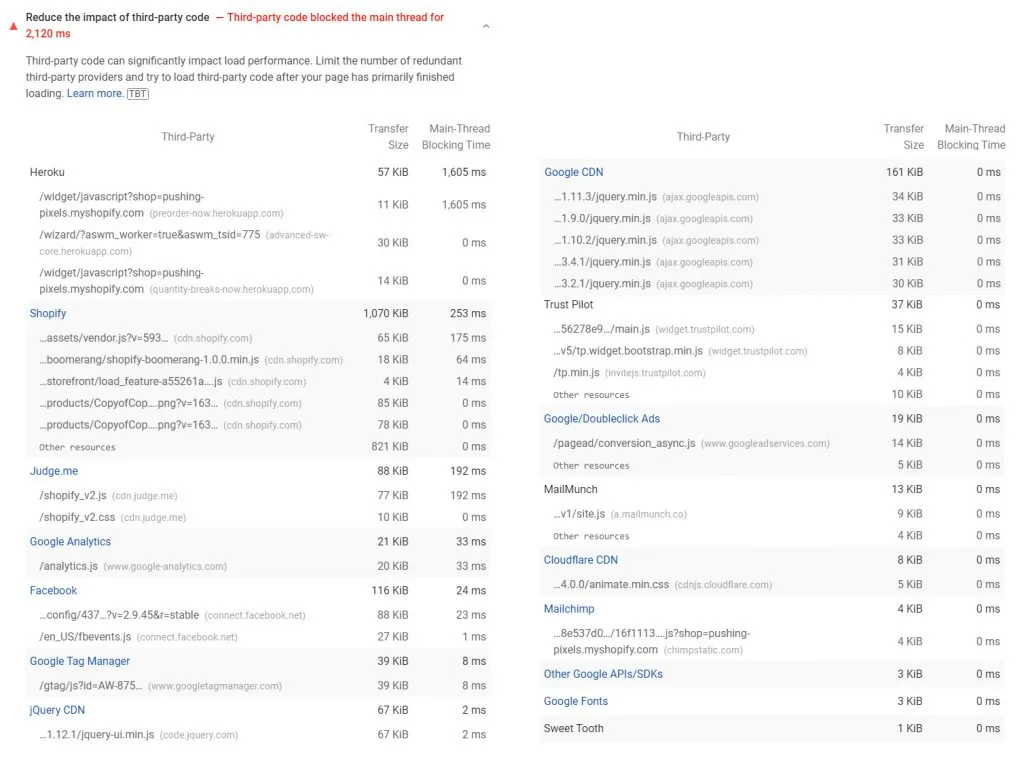
We’re looking for domains and scripts here that we’re no longer using, if you’re seeing any, these can be removed as they’re unnecessarily slowing down the page.
Beyond that, we can also manually check the theme files for any unnecessary app code.
To do these things, I’d recommend having a developer look through your theme.liquid file, along with other theme files, then identify and remove any unused scripts or code.
Conditionally load app scripts
By default, most app scripts are added to your theme.liquid file so they load across every page - this is convenient. But it’s also slow.
It’s the equivalent of carrying an umbrella with you 24/7 for the off-chance it may rain - some day. Wouldn’t it be more effective to only have an umbrella when it rains?
With apps this can be achieved with conditional loading.
In short, if a condition is met, the app script is loaded.
For example:
- Product Reviews: If these are only shown on the product page, then conditionally load this script on product pages only
- Social Share Buttons: Are you using these on every page? Or just the blog posts? If it’s only certain types of pages, then load them only on these
- Product Image Zoom, Infinite Options, and more: Any product page specific features like this likely only need loaded on the product page
Now this is something I’d strongly recommend using a developer and testing properly, but the code itself is a simple if statement.
For example:
<script>
{% if template == 'product' %}
<!-- Your script here -->
{% endif %}
</script>
Or for specific pages:
<script>
{% if page.handle == 'contact' %}
<!-- Your script here -->
{% endif %}
</script>
Minify Javascript and CSS files
As with writing articles, when developers write code they usually do it with elements of style in there.
This comes in the
form
of
spacing,
// Comments
And other ways of making the code easier to understand.
Minifying refers to the process of eliminating this styling, as it’s unnecessary for robots, which will in turn reduce the size of the file.
For non-developers, there’s apps that can minify these files for you such as File Optimizer.
Otherwise you can do this manually with JSCompress, and let Shopify do it for you automatically with CSS files by turning them to .scss.css format.
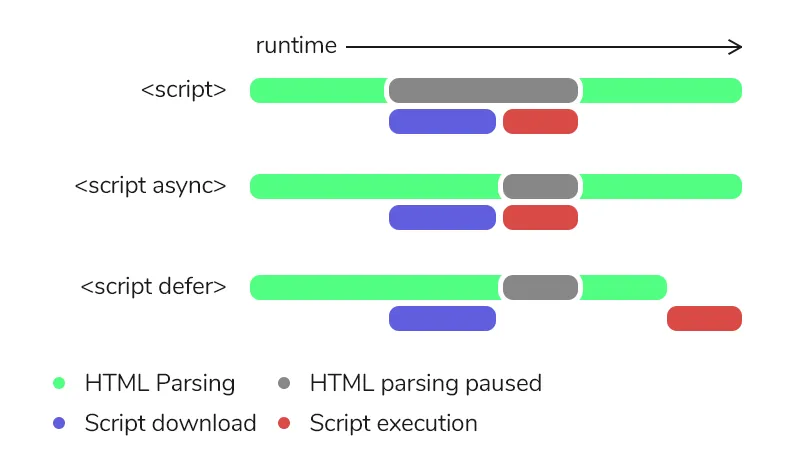
Async non-essential scripts
If you have scripts that aren’t essential for the initial page load, you can defer them so they’re loaded last, or load is asynchronously so the full script is loaded in the background before being executed.
Again, this should only be done for non-essential scripts.
Essential scripts will be things like jQuery that directly impact the website functionality.
But maybe you have a live chat script, while helpful for conversions, it can absolutely be deferred to speed up loading the actual page and content first.
Analytics and tracking scripts are another thing that can be loaded asynchronously to speed up rendering the page.
This diagram explains the differences in how these are loaded:
This is something you should have a developer implement for it, but it’s relatively simple again by adding defer or async to your script tags.
Use Resource Hints / Preloading
Resource hints including preload, prefetch, dns-prefetch, or preconnect; are used to optimise the loading of important resources.
Each has a different purpose as follows:
preloadFetch a critical resource for the current page before the page begins renderingprefetchFetch resources not needed on the current page, but likely needed on next page e.g. stylesheetdns-prefetchReduces latency by performing a DNS lookup ahead of time to a domain you will load resources from. Note this is performed after the current page has loaded.preconnectFor when you plan to fetch content from a specific domain within 10 seconds. Similar to DNS-Prefetch but also does TCP handshake and TLS negotiation.
These can be used by modifying the <link> elements to add a rel= attribute, such as:
<link rel="preload" href="{{ jquery.min.js | asset_url }}" as="script">
<link rel="prefetch" href="{{ stylesheet.css | asset_url }}">
<link rel="dns-prefetch" href="//cdn.shopify.com">
<link rel="preconnect" href="//cdn.shopify.com">
Final Thoughts
Out of the box, Shopify is a pretty quick platform and does a lot of speed optimisations automatically.
But with a huge number of images, inefficient themes, and a never ending list of apps to install - it’s easy to bloat your website and slow it down.
I’d highly recommend working with a developer to implement these 10 changes, not only for the SEO benefits, but for the conversion benefits of having a fast loading website.
With eCommerce, you’ll never have a perfect page speed or score. But there should be a very noticeable difference in page loading times after implementing these suggestions.
If you need any help with this, we’re now offering this as a service to our SEO clients, so feel free to get in touch here.